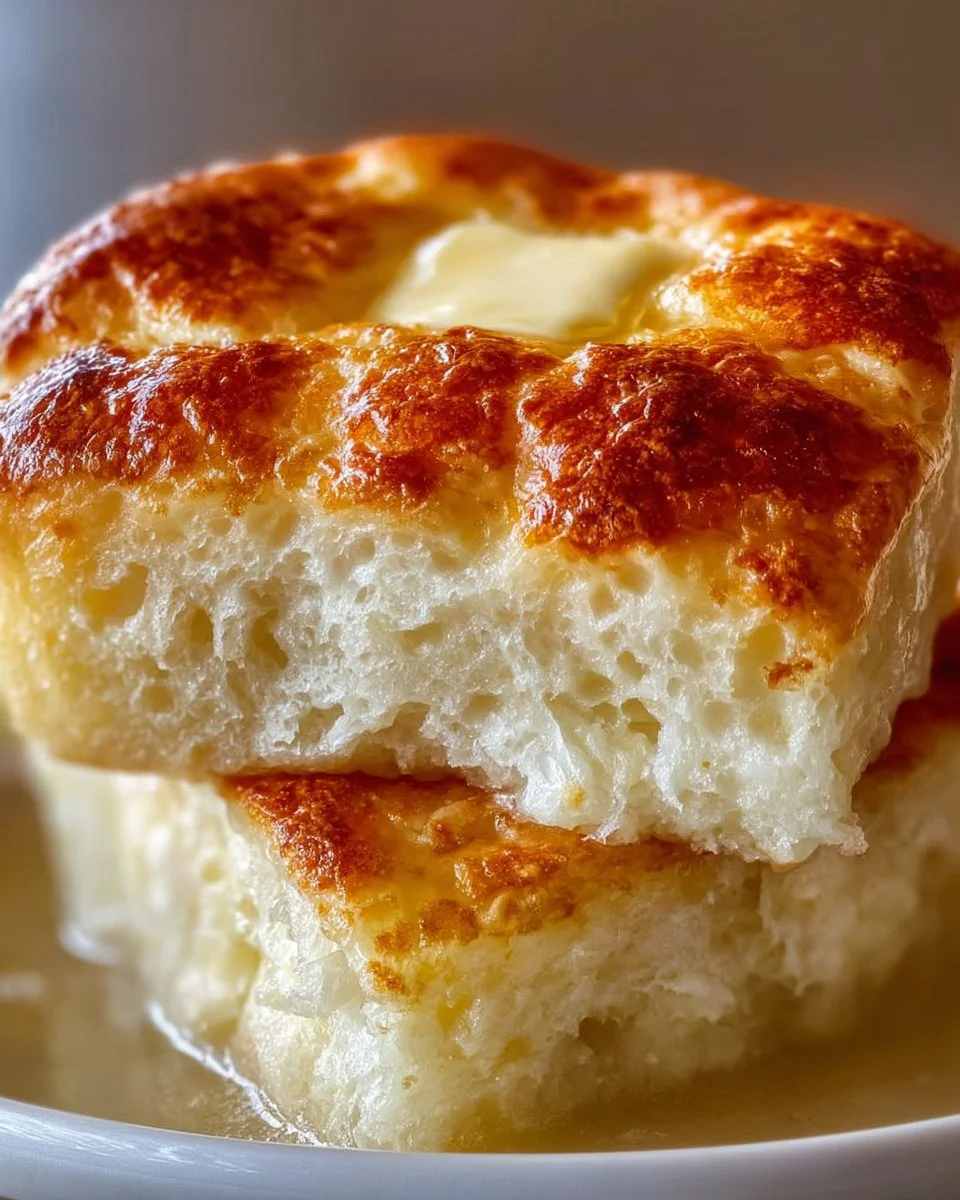
Imagine the unmistakable aroma of warm bread wafting through your kitchen, wrapping you in a comforting hug of warmth and nostalgia. Picture golden-brown rounds pulsating with a soft, cloud-like center, begging to be slathered with creamy butter or drizzled with rich honey. This is no ordinary bread; it is No-Oven Stovetop Bread, a delightful creation that brings the joy of freshly baked bread into your home without the need for an oven. Each bite offers a symphony of lightness and satisfaction, evoking joy as you pull apart its tender crust.
The beauty of this stovetop bread lies not only in its simplicity but also in its ability to transport you moments of happiness, whether you’re cooking for a gathering or enjoying a quiet evening with loved ones. Imagine breaking the bread apart, the endearing crunch of the crust, contrasted beautifully by its fluffy interior. Paired with a warm cup of tea or an indulgent spread, this bread transforms an ordinary meal into a moment of bliss.
Why You’ll Love This No-Oven Stovetop Bread
This No-Oven Stovetop Bread stands apart in a world filled with complicated recipes and time constraints. It takes just a handful of ingredients—everything you likely already have in your pantry—and allows you to craft something truly extraordinary in a fraction of the time. This bread boasts an enticingly soft texture that continues to impress long after you’ve savored your first bite. Its mild sweetness, courtesy of a touch of sugar, complements savory spreads or makes it perfect for breakfast with jam and butter.
Perfect for any occasion, this bread shines bright as a sidekick to soups, a hearty addition to your brunch spread, or a base for unforgettable sandwiches. Whether you’re gathering friends for a casual dinner or simply craving a snack, it brings warmth and joy to the table. Additionally, the stovetop method eliminates the need for preheating your oven, saving energy and making this a go-to recipe on busy days or hot summer evenings when the thought of a hot oven sounds unbearable.
Preparation Phase & Tools to Use
To create this beautiful No-Oven Stovetop Bread, you’ll need a few essential tools that make the process seamless and enjoyable:
- Mixing Bowl: A large mixing bowl serves as your creative space, bringing all the ingredients together for a cohesive dough.
- Whisk: This tool helps in effortlessly combining the dry ingredients, ensuring there are no lumps.
- Rolling Pin or Your Hands: For flattening the dough balls, use a rolling pin or your hands, bringing that personal touch to each piece of bread.
- Non-Stick Skillet: A reliable non-stick skillet is key for achieving that golden crust without any sticking and ensures everything cooks evenly.
Ingredients for No-Oven Stovetop Bread
Gather these simple ingredients, and you’ll be well on your way to crafting your delicious creation:
- 2 cups all-purpose flour: The base of your bread, providing the structure and important binding.
- 1 tablespoon baking powder: This ingredient is crucial for the light, airy texture.
- 1 teaspoon salt: Salt enhances and balances the flavors.
- 1 tablespoon sugar: A tiny touch of sweetness elevates the flavor profile.
- 1 cup milk: This brings moisture and richness to the dough.
- 2 tablespoons butter, melted: Adding melted butter infuses flavor and moisture, creating a tender crumb.
Feel free to experiment with substitutions! You can use whole wheat flour for a nuttier taste, or buttermilk instead of regular milk for an extra layer of flavor.
How to Make No-Oven Stovetop Bread
- In a large mixing bowl, whisk together all-purpose flour, baking powder, salt, and sugar until well combined.
- Gradually pour in milk and melted butter, stirring gently until a soft dough starts to form.
- Transfer the dough onto a floured surface. Knead gently for about 2-3 minutes until smooth and elastic. Tip: Don’t over-knead; we want tender, soft bread.
- Divide the dough into smaller balls, about the size of a golf ball, and flatten them slightly with your hands.
- Heat a non-stick skillet over medium heat. Cook the flattened dough pieces for 5-6 minutes on each side until they are golden brown and puffed. Tip: Keep a close eye on them; each stove is different, and they can burn quickly!
- Serve warm with a dab of butter and a drizzle of honey, or use them as delicious wraps for sandwiches.
Chef’s Notes & Helpful Tips
- Make-Ahead Tips: This dough can be prepared ahead of time. Form the dough balls and refrigerate them for up to 24 hours before cooking. Just remember to let them come to room temperature before cooking!
- Cooking Alternatives: If you have an air fryer, you can use it to give the bread a delightful crunch. Set it to 300°F and cook for 6-8 minutes as an alternative.
- Customization Ideas: Feel adventurous? Add fresh herbs like rosemary or thyme, or fold in shredded cheese for a savory twist. You can also experiment with spices like garlic powder or smoked paprika for added flavor.
Common Mistakes to Avoid
One of the most common mistakes is over-kneading the dough, leading to a dense texture that betrays the lightness you crave. Remember, a little gentle kneading goes a long way! Additionally, be cautious with your cooking time; keep a watchful eye on the skillet to avoid over-browning. Lastly, don’t skip the resting period after forming the dough balls; it allows them to relax and puff beautifully while cooking.
What to Serve With No-Oven Stovetop Bread
The versatility of this bread allows it to shine alongside many dishes. Consider serving it with:
- Hearty soups: A warm bowl of creamy tomato or vegetable soup begs for this bread to soak in its flavors.
- Stews: Its forgiving texture holds up to rich, meaty stews, adding satisfaction to each bite.
- Breakfast spreads: Top with avocado, poached eggs, or creamy ricotta for an exquisite morning treat.
- Salads: Pair with a refreshing side salad, offering a contrast between the crisp veg and soft bread.
- Sandwich wraps: Use them as wraps for grilled chicken, fresh veggies, or even a classic PB&J.
- Cheese boards: Serve with an assortment of cheeses and charcuterie for an impressive platter.
Storage & Reheating Instructions
Store any leftovers in an airtight container at room temperature for up to 2 days. If you’d like to make them last longer, feel free to freeze them! Wrap each piece in plastic wrap and place in a freezer bag for up to 3 months. To reheat, simply pop them in a skillet over low heat for a few minutes, or microwave them for 10-15 seconds wrapped in a damp paper towel to ensure they stay moist.
Estimated Nutrition Information
Approximate values per serving (1 piece):
- Calories: 160
- Protein: 4g
- Fat: 6g
- Carbohydrates: 23g
- Fiber: 1g
Disclaimer: Nutritional values may vary based on ingredient brands and portion sizes.
FAQs
Can I use whole wheat flour instead of all-purpose flour?
Absolutely! Whole wheat flour will give the bread a denser texture and nuttier flavor. You may need to adjust the liquid slightly as whole wheat absorbs more moisture.
What if I don’t have baking powder?
If you don’t have baking powder, you can substitute with 1/4 teaspoon baking soda and 1/2 teaspoon vinegar or lemon juice for every teaspoon of baking powder. This leavens the bread as well but will slightly change the flavor.
How can I achieve a different flavor profile?
Try adding ingredients such as crushed garlic, fresh herbs, or spices like cumin or coriander for a unique twist. The beauty of this bread is in its adaptability!
Can I double this recipe?
Yes! Just make sure you have a large-enough mixing bowl and cook them in batches, ensuring they don’t overcrowd the skillet.
What’s the best way to serve this bread?
Warm, with fluffy butter and a drizzle of honey is divine, but it’s also perfect for all your favorite spreads. You can’t go wrong with classic pairings.
Conclusion
As you stand at the stove, the scent of your golden No-Oven Stovetop Bread fills the air, stirring anticipation and delight. Your kitchen transforms into a haven of warmth, and with every bite, you embrace the comfort that this simple recipe brings to your life. So gather your loved ones, whip up a batch, and watch as it offers not just sustenance, but smiles and cherished moments. Dive into this experience, and let the magic of homemade bread grace your table today!
Print
No-Oven Stovetop Bread
- Prep Time: 10 minutes
- Cook Time: 12 minutes
- Total Time: 22 minutes
- Yield: 6 servings 1x
- Category: Bread
- Method: Stovetop
- Cuisine: American
- Diet: Vegetarian
Description
A delightful stovetop bread that offers a soft texture and warmth without needing an oven.
Ingredients
- 2 cups all-purpose flour
- 1 tablespoon baking powder
- 1 teaspoon salt
- 1 tablespoon sugar
- 1 cup milk
- 2 tablespoons butter, melted
Instructions
- Whisk together all-purpose flour, baking powder, salt, and sugar until well combined.
- Pour in milk and melted butter, stirring gently until a soft dough forms.
- Transfer the dough to a floured surface and knead gently for about 2-3 minutes until smooth.
- Divide the dough into smaller balls, about the size of a golf ball.
- Heat a non-stick skillet over medium heat and cook the dough pieces for 5-6 minutes on each side until golden brown.
- Serve warm with butter and honey or use for sandwiches.
Notes
Make-ahead option: Refrigerate formed dough balls for up to 24 hours before cooking. Avoid over-kneading for a light texture.
Nutrition
- Serving Size: 1 piece
- Calories: 160
- Sugar: 1g
- Sodium: 400mg
- Fat: 6g
- Saturated Fat: 3g
- Unsaturated Fat: 3g
- Trans Fat: 0g
- Carbohydrates: 23g
- Fiber: 1g
- Protein: 4g
- Cholesterol: 15mg