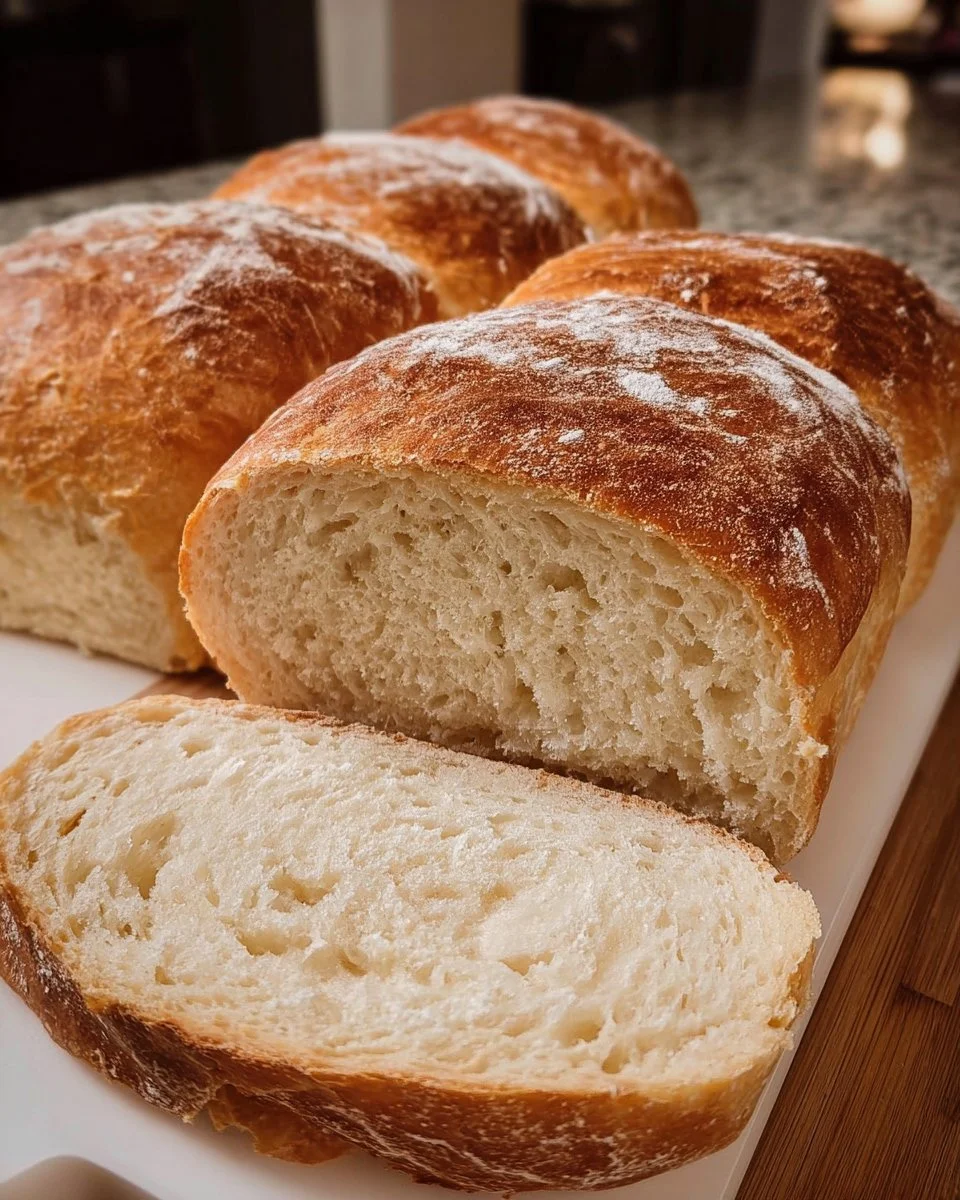
Imagine stepping into your kitchen, enveloped in the warm embrace of golden-brown baking bread. The rich aroma dances in the air, teasing your senses and stirring memories of hearth and home. As the crust crackles ever so slightly when you slice through it, enchanting wisps of steam escape, revealing a soft, cloud-like interior. Homemade no-knead sandwich bread offers a divine balance of crusty exterior and pillowy softness, coaxing you into a comforting culinary experience that nourishes not just the body, but the soul.
The sheer simplicity of this recipe belies its extraordinary flavor profile. Each bite unfurls a gentle sweetness, paired with nutty undertones. You savor the lightly toasted edges, each crumb yielding a slight chew before melting in your mouth. Whether you fancy slathering it with creamy butter, or crafting the ultimate sandwich, this bread transforms the ordinary into the extraordinary, enchanting everyone lucky enough to share in it.
Why You’ll Love This Homemade No-Knead Sandwich Bread
This bread achieves a remarkable depth of flavor with minimal effort. Requiring just four nutritious ingredients, it stands out as the perfect backdrop for your culinary creativity. Think of how this airy loaf envelops juicy grilled chicken or tender roast beef in a buttery embrace, or how it cradles fresh, vibrant vegetables drizzled with tangy dressing—each bite bursting with flavor.
What makes this recipe especially captivating is its no-knead method. It flourishes with an extended fermentation time, allowing the yeast to work its magic without the need for laborious kneading. This means more time savoring the anticipation and delightful aroma wafting through your home. You’ll appreciate the ability to customize your loaf to your taste—experimenting with spices, herbs, or even a pinch of garlic for added flair makes each bake your own.
Preparation Phase & Tools to Use
Before embarking on this baking adventure, gather a few essential tools that will turn your ingredients into a masterpiece.
- Large Mixing Bowl: A sturdy bowl allows for easy mixing and room for dough expansion.
- Plastic Wrap or Towel: These keep the dough warm and snug, encouraging bubbly fermentation.
- Dutch Oven: A heavy pot that works wonders in creating a steam environment is essential for achieving a crust that’s crisp, yet tender inside.
- Wooden Spoon or Rubber Spatula: For stirring, these tools provide good leverage without damaging your bowl.
- Flour for Surface Dusting: A little dusting flour ensures easy handling of the dough as you shape it.
To make the journey smoother, prepare your workspace by ensuring surfaces are clean and all ingredients are at hand.
Ingredients for Homemade No-Knead Sandwich Bread
- 3 cups all-purpose flour: The foundation of your bread; feel free to swap in whole wheat or a gluten-free blend, though this may alter texture.
- 1 ½ teaspoons salt: Enhances flavor and controls yeast activity for perfect fermentation.
- 1 teaspoon instant yeast: This quick-rising option ensures your dough doesn’t stall.
- 1 ½ cups warm water: The perfect temperature awakens the yeast and activates the ingredients.
Each ingredient plays a vital role in creating the harmonious balance that defines this loaf. Feel free to explore alternatives, such as adding herbs to the flour for a savory touch or swirling in zesty cheese.
How to Make Homemade No-Knead Sandwich Bread
-
Whisk Together: In a large bowl, combine the all-purpose flour, salt, and instant yeast. Mix thoroughly to ensure even distribution.
-
Add Water: Gradually pour the warm water into the dry ingredients, using a wooden spoon or rubber spatula to stir until a sticky dough forms. Don’t fret about precision—this dough embraces imperfection.
-
Let It Rest: Cover the bowl with plastic wrap or a clean towel. Let the dough rest at room temperature for 12 to 18 hours. During this time, your dough will transform into something magical, bubbling with life.
-
Shape the Dough: After the resting period, check for bubbling on the surface. Gently turn out the dough onto a generously floured surface, using a spatula if needed to avoid sticking. Dust your hands with flour and shape the dough into a ball.
-
Final Rise: Transfer the ball to a lightly floured surface and let it rise, uncovered, for about 1 hour. This important step allows it to puff up and deepen in flavor.
-
Preheat the Oven: As the dough rises, preheat your oven to 450°F (230°C). Place the Dutch oven, covered, inside to heat up. The preheated pot creates the perfect environment for baking with steam.
-
Bake the Bread: Carefully remove the hot Dutch oven. Gently transfer the risen dough into it, then cover with the lid. Bake for 30 minutes.
-
Uncover and Continue Baking: Remove the lid and bake for an additional 15 to 20 minutes, checking periodically until the crust is golden brown and crackles.
-
Cool and Slice: Once baked, let the loaf cool on a wire rack for at least 30 minutes before slicing. The cooling period allows the crumb to set, ensuring perfect slices.
Chef’s Notes & Helpful Tips
- Make-Ahead Tips: If you’re short on time, prepare the dough the night before, allowing it to rest overnight. The next day, you can quickly shape and bake your loaf.
- Cooking Alternatives: Consider using an air fryer or convection oven if you lack a Dutch oven. The same methods apply—just adjust the cooking time slightly.
- Customization Ideas: Try adding herbs like rosemary or garlic powder to the dough or mix in nuts or seeds for texture and flavor.
Common Mistakes to Avoid
Baking can be a meticulous science. Here are some common pitfalls and ways to avoid them:
- Not Letting the Dough Rest Long Enough: Patience pays off during the fermentation phase. Rushing this process leads to denser bread.
- Using Cold Water: Always ensure the water is warm; cold water stunts yeast activity.
- Overor Under-Flouring the Surface: Too much flour while shaping can produce a dry loaf, whereas too little can make the dough unmanageable.
What to Serve With Homemade No-Knead Sandwich Bread
This versatile loaf pairs beautifully with a variety of dishes:
- Classic Sandwiches: Load it up with turkey, cheese, and fresh lettuce for a lunch favorite.
- French Toast: Dip slices in an egg mixture and pan-fry for a delightful breakfast treat, drizzled with maple syrup.
- Soup: Pair it with a hearty tomato bisque; the bread makes the perfect vessel for sopping.
- Avocado Toast: Toast slices and top them with smashed avocado, lemon juice, and a sprinkle of chili flakes.
- Grilled Cheese: Use this bread for an indulgent take on a classic favorite, creating the perfect crispy outer layer.
- Sweet Spreads: A smear of homemade jam or Nutella takes this bread into the realm of a decadent snack.
Storage & Reheating Instructions
To maintain its freshness, store the cooled bread in a zippered plastic bag or wrap it in a clean kitchen towel at room temperature for up to 3 days. For longer storage, slice and freeze individual pieces, keeping them wrapped in parchment paper and stored in a freezer bag. Reheat slices in a toaster for crispness, or pop them in the microwave for a few seconds for a warm, soft treat.
Estimated Nutrition Information
While the exact values vary, here’s an approximate breakdown per slice (1/16 of a loaf):
- Calories: 120
- Carbohydrates: 25g
- Protein: 4g
- Fat: 0.5g
- Fiber: 1g
Disclaimer: These values are estimates and will vary based on specific ingredients used.
FAQs
1. Can I use whole wheat flour instead of all-purpose flour?
Absolutely! Whole wheat flour will add a nutty flavor and more fiber. Keep in mind that the texture may be denser, so you might need to adjust the water content slightly.
2. How can I tell when my bread is done baking?
Check for a golden-brown crust, and tap the bottom of the loaf; it should sound hollow. As a final test, you can use an instant-read thermometer—an internal temperature of about 200°F (93°C) means it’s done.
3. What if my dough doesn’t rise?
If your dough fails to rise, it may be due to inactive yeast. Always check the expiration date, and ensure the water temperature is just warm to the touch, not hot, which can kill the yeast.
4. How do I achieve a crispy crust?
The Dutch oven traps steam during baking, contributing to a crusty exterior. For extra crust, bake uncovered in the last phase, allowing moisture to escape.
5. Can I add mix-ins like cheese or herbs?
Absolutely! Fold in mix-ins after your dough has formed but before the final shaping. Be sure not to overdo it, as too much weight can affect your loaf’s rise.
Conclusion
Embarking on the journey of creating homemade no-knead sandwich bread infuses your home with warmth, creativity, and delightful aromas that linger long after the baking is done. Each slice beckons with a symphony of flavors and textures, encouraging you to gather around the table with those you cherish. Whether you enjoy it simply with butter or load it with your favorite ingredients, this loaf stands as a testament to the joys of homemade baking. Dive in, savor the process, and let each bite carry you into a world of comforting, warm memories.
Print
Homemade No-Knead Sandwich Bread
- Prep Time: 15 minutes
- Cook Time: 45 minutes
- Total Time: 12 hours 45 minutes
- Yield: 16 slices 1x
- Category: Bread
- Method: Baking
- Cuisine: American
- Diet: Vegetarian
Description
Create a delicious no-knead sandwich bread that features a crusty exterior and a soft, fluffy interior, perfect for any meal or snack.
Ingredients
- 3 cups all-purpose flour
- 1 ½ teaspoons salt
- 1 teaspoon instant yeast
- 1 ½ cups warm water
Instructions
- Whisk together the all-purpose flour, salt, and instant yeast in a large bowl.
- Add the warm water gradually into the dry ingredients, stirring until a sticky dough forms.
- Let the dough rest at room temperature for 12 to 18 hours, covered with plastic wrap or a clean towel.
- Shape the dough into a ball on a floured surface after checking for bubbles.
- Transfer the shaped dough to a lightly floured surface and let it rise uncovered for about 1 hour.
- Preheat your oven to 450°F (230°C) and place a Dutch oven inside to heat up.
- Bake the bread in the hot Dutch oven, covered, for 30 minutes.
- Uncover and bake for an additional 15 to 20 minutes until the crust is golden brown.
- Cool the loaf on a wire rack for at least 30 minutes before slicing.
Notes
Feel free to customize your loaf by adding herbs or spices for added flavor.
Nutrition
- Serving Size: 1 slice
- Calories: 120
- Sugar: 1g
- Sodium: 300mg
- Fat: 0.5g
- Saturated Fat: 0g
- Unsaturated Fat: 0g
- Trans Fat: 0g
- Carbohydrates: 25g
- Fiber: 1g
- Protein: 4g
- Cholesterol: 0mg